Class and Type: Frontier-class Strike Cruiser
Commissioning Date: December 15, 2372
Hull Systems
Size: 7
Length: 545.38 meters
Beam: 350.25 meters
Height: 102.02 meters
Decks: 21
Mass: 4,000,000 metric tonnes
SU's Available: 3,350
SU's Used: 2,750
Hull:
Outer:
28
Inner:
28
Resistance:
Outer Hull: 10
12
Inner Hull: 10
12
Ablative Armor: 1500
200
Structural Integrity Field:
Main: class 6 [Protection 90/130]
Backup: class 6 [Protection 50]
Backup: class 6 [Protection 50]
Emergency: class 7 [Protection 60]
Specialized Hull
Atmospheric capable (Saucer)
Planet fall (Saucer)
Sensor Reflective Hull
Personnel Systems:
Crew/Passengers/Evac: 450/3000/6000
Crew Breakdown:
Branch:
Command: 16
Operations:
Engineering/Technical: 14
Operations, General: 28
Security/Tactical: 18
Science:
Medical/Support: 12
Science/Research: 14
Officers/Enlisted: 71
Marines:
Command: 6
Standard/Soldiers: 42
Specialized/Demolitions: 12
RRT: 24
Roster
CO: Commodore Kyle A. Roberts
XO: Captain Kirtsyn Castelli
OPS: Commander Velok
TACTICAL: Lt. Commander Crimm Danos
CMO: Dr. Kulei Esleen
CONN: Lt. Elisandro Perez
SCIENCE: Lt. Muaryn
INTELL: Lt. Jespra On'an
ENGINEERING: Chief Petty Officer Augulis Paquab
THEORETICAL: Commander Arix
MARINES: Major Kal Norvohl
Crew Quarters
Spartan: 200
Basic: 500
Expanded: 200
Luxury: 50
Unusual: 20
Environmental Systems
Basic Life Support: [12 Power/Round]
Reserve Life Support: [6 Power/Round]
Emergency Life Support: (48 Emergency Shelters)
Gravity: [4 Power/Round]
Consumables: 3 Years
Food Replicators [8 Power/Round]
Industrial Replicators
Type: Network of Small Replicators [2 Power/Round]
Type: 3 Large Units [2 Power/replicator/Round]
Medical Facilities: 9
EMH: Mark IV
Recreation Facilities: 6
Personnel Transports: Turbolifts, Jefferies Tubes
Fire Suppression System: [1 Power/Round when active]
Cargo Holds: 125,000 cubic Meters
Locations: Saucer Port, Saucer Starboard 15 other Locations
Escape Pods:
Number: 180
Capacity: 8 persons per pod
Propulsion Systems
Warp Drive
Nacelles: Type 6E9
Speed: 8.0/9.7/9.98
PSI: Type J (25-48 Hours)
Impulse Engines
Type: Class 8 (.75c/.95c) 64 power
Acceleration uprating: Class Gamma
Location: Aft, Port Starboard Saucer. SLAM retractable mounted aft
Dorsal Engineering hull
Reaction Control System:
Impulse Thrusters: 8 [2 Power/Round]
Power Systems
Warp Engine
Type: Class 13/S (generates 750 power per round)
Location: Engineering hull
Impulse Engines: 175
Auxiliary Power: 128
Emergency Power: Type F
Quantum Flux Collimators: 250/250 (Per unit)
EPS/TPS: Power Flow, +500 Power transfer/Rounds
Standard Usable Power: 1000
Operations Systems
Bridge: Saucer Dorsal (Submerged)
Auxiliary Control Rooms: Sub-Bridge, Deck 15 aft saucer
Separation System: Standard, needs Starbase to reunite.
Computers (Bio-Neural)
Core 1: Saucer, Port [5 Power/Round]
Core 2: Saucer, Starboard [5 Power/Round]
Core 3: Engineering, Port [5 Power/Round]
Core 4: Engineering, Starboard [5 Power/Round]
Uprating: Class Beta (+2) [2 Power/computer/round]
ODN
Navigational Deflector
Range: 10/20,000/50,000/150,000
Accuracy: 5/6/8/11
Location: Forward Engineering Hull, Ventral saucer
Auxiliary Deflector: Ventral Saucer, forward
Sensor Systems
Long-Range Sensors:
Range package: Type 8
High Resolution: 6 Lightyears (.5/.6-1.0/1.1-4.5/4.6-6.0)
Low Resolution: 18 Lightyears (1/1.1-6.5/6.6-13.5/13.6-18)
Strength Package: 10
Gain Package: Class Gamma
Coverage: 3,000 additional Substances
Lateral Sensors:
Strength Package: 10
Gain Package: Class Gamma +3
Coverage: 3,000 Additional substances
Navigational Sensors:
Strength Package: 10
Gain Package: Class Gamma +3
Probes: 100
Sensor Skill:
Flight Control Systems
Autopilot: Shipboard (Flight Control) 4, Coordination 3 [1 Power/Round
in use] 15
Main: Class 3 (+2) [2 Power/Round]
Backups: 2
Interial Dampening Field:
Main
Strength: 9 [3 Power/Round]
Number: 4
Backup
Strength: 9 [2 Power/Round]
Number: 4
Attitude Control: [2 Power/Round]
Communications Systems
Type: Class 10
Strength: 10
Security: -5
Basic Uprating: Class Epsilon
Emergency Communications: Yes [2 Power/Round]
Holocommunications: Yes
Tractor Beams
Emitter: Class Delta [3 Power/Strength used /Round]
Accuracy: 4/5/7/10
Location: Forward Dorsal
Emitter: Class Delta [3 Power/Strength used /Round]
Accuracy: 4/5/7/10
Location: Aft Dorsal
Emitter: Class Delta [3 Power/Strength used /Round]
Accuracy: 4/5/7/10
Location: Forward Ventral
Emitter: Class Delta [3 Power/Strength used /Round]
Accuracy: 4/5/7/10
Location: Aft Ventral
Emitter: Class Alpha [3 Power/Strength used/Round]
Accuracy: 5/6/8/11
Location: One in each Shuttlebay
Transporter
Type: Personnel [5 Power/use]
Pads: 6
Emitter/Receiver Array: Personnel Type 6 [40,000 Km range]
Energizing/Transition Coils: class 1 (Strength 9)
Number And Location: 4 In saucer, 2 in engineering hull
Type: Emergency [7 Power/use]
Pads: 24
Emitter/Receiver Array: Emergency Type 3 [15,000 km]
Energizing/Transition Coils: class 1 (Strength 9)
Number And Location: 4 in Saucer, 2 in Engineering hull
Type: Cargo [4 Power/use]
Pads: 400 kg
Emitter/Receiver Array: Cargo Type 3 [40,000 km]
Energizing/Transition Coils: class 1 (Strength 9)
Number and Location: 5 in Saucer, 3 in Engineering hull
Cloaking Device: None
Para-Dynamic Hull Holo-emitters
Interphase Generator
Security Systems
Rating: 5
Anti Intruder System: Yes [2 Power/Round]
Internal Force Fields: [1 Power/3 Strength]
Science Systems
Rating 3 (+2)
Specialized Systems: 3
Laboratories: 20
Tactical Systems
Saucer Dorsal Forward Port Phaser Array 1
Type: XI
Damage: 220 [22 Power]
Number of Emitters: 180 ( Up to 4 per shot)
Auto-Phaser Interlock: 3/4/6/9
Range: 10/30,000/100,000/300,000
Location: Saucer Dorsal Port Forward
Firing Arc: 270 degree's Dorsal
Firing Modes: Standard, Continuous, Pulse, Wide-Beam
Saucer Dorsal Forward Starboard Phaser Array 1
Type: XI
Damage: 220 [22 Power]
Number of Emitters: 180 ( Up to 4 per shot)
Auto-Phaser Interlock: 3/4/6/9
Range: 10/30,000/100,000/300,000
Location: Saucer Dorsal Starboard Forward
Firing Arc: 270 degree's Dorsal
Firing Modes: Standard, Continuous, Pulse, Wide-Beam
Saucer Dorsal Forward Port Phaser Array 2
Type: XI
Damage: 220 [22 Power]
Number of Emitters: 180 ( Up to 4 per shot)
Auto-Phaser Interlock: 3/4/6/9
Range: 10/30,000/100,000/300,000
Location: Saucer Dorsal Port Forward
Firing Arc: 270 degree's Dorsal
Firing Modes: Standard, Continuous, Pulse, Wide-Beam
Saucer Dorsal Aft Port Phaser Array 1
Type: XI
Damage: 220 [22 Power]
Number of Emitters: 180 ( Up to 4 per shot)
Auto-Phaser Interlock: 3/4/6/9
Range: 10/30,000/100,000/300,000
Location: Saucer Dorsal Port Aft
Firing Arc: 270 degree's Dorsal
Firing Modes: Standard, Continuous, Pulse, Wide-Beam
Saucer Dorsal Aft Starboard Phaser Array 1
Type: XI
Damage: 220 [22 Power]
Number of Emitters: 180 ( Up to 4 per shot)
Auto-Phaser Interlock: 3/4/6/9
Range: 10/30,000/100,000/300,000
Location: Saucer Dorsal Starboard Aft
Firing Arc: 270 degree's Dorsal
Firing Modes: Standard, Continuous, Pulse, Wide-Beam
Saucer Dorsal Aft Port Phaser Array 2
Type: XI
Damage: 220 [22 Power]
Number of Emitters: 180 ( Up to 4 per shot)
Auto-Phaser Interlock: 3/4/6/9
Range: 10/30,000/100,000/300,000
Location: Saucer Dorsal Port Aft
Firing Arc: 270 degree's Dorsal
Firing Modes: Standard, Continuous, Pulse, Wide-Beam
Saucer Dorsal Aft Starboard Phaser Array 2
Type: XI
Damage: 220 [22 Power]
Number of Emitters: 180 ( Up to 4 per shot)
Auto-Phaser Interlock: 3/4/6/9
Range: 10/30,000/100,000/300,000
Location: Saucer Dorsal Aft Starboard
Firing Arc: 270 degree's Dorsal
Firing Modes: Standard, Continuous, Pulse, Wide-Beam
Saucer Ventral Port Phaser Array
Type: XI
Damage: 220 [22 Power]
Number of Emitters: 200 (Up to 5 Per Shot)
Auto-Phaser Interlock: 3/4/6/9
Range: 10/30,000/100,000/300,000
Location: Saucer Ventral Port
Firing Arc: 360 degrees Ventral
Firing Modes: Standard, Continuous, Pulse, Wide-Beam
Saucer Ventral Starboard Phaser Array
Type: XI
Damage: 220 [22 Power]
Number of Emitters: 200 (Up to 5 Per shot)
Auto-Phaser Interlock: 3/4/6/9
Range: 10/30,000/100,000/300,000
Location: Saucer Ventral Starboard
Firing Arc: 360 degrees Ventral
Firing Modes: Standard, Continuous, Pulse, Wide-Beam
Engineering Ventral Phaser Array
Type: XI
Damage: 220 [22 Power]
Number of Emitters: 100 (Up to 3 per shot)
Auto-Phaser Interlock: 3/4/6/9
Range: 10/30,000/100,000/300,000
Location: Engineering Ventral
Firing Arc: 360 degree's Ventral
Firing Modes: Standard, Continuous, Pulse, Wide-Beam
Engineering Dorsal Phaser Array
Type: XII
Damage: 220 [22 Power]
Number of Emitters: 225 (Up to 5 per shot)
Auto-Phaser Interlock: 3/4/6/9
Range: 10/30,000/100,000/300,000
Location: Engineering Dorsal
Firing Arc: 360 degree's Dorsal
Firing Modes: Standard, Continuous, Pulse, Wide-Beam
Engineering Dorsal Aft Phaser Array
Type: XI
Damage: 220 [22 Power]
Number of Emitters: 100 (Up to 3 per shot)
Auto-Phaser Interlock: 3/4/6/9
Range: 10/30,000/100,000/300,000
Location: Engineering Dorsal, aft
Firing Arc: 270 degrees Dorsal
Firing Modes: Standard, Continuous, Pulse, Wide-Beam
Engineering Ventral , Aft Phaser Array
Type: XI
Damage: 220 [22 Power]
Number of Emitters: 100 (Up to 3 per shot)
Auto-Phaser Interlock: 3/4/6/9
Range: 10/30,000/100,000/300,000
Location: Engineering Ventral, aft
Firing Arc: 270 degrees ventral
Firing Modes: Standard, Continuous, Pulse, Wide-Beam
Saucer Port Phaser G Cannon (Dorsal)
Type: X Pulse/ Phalanx Phaser G
Damage: 250 [25 Power]
Number of Emitters: 200 (up to 7 Shots per Round)
Auto-Phaser Interlock: 3/4/6/9
Range: 10/30,000/100,000/300,000
Location: Port Central Dorsal bridge module (Retractable housing)
Firing Arc: 360 degree's
Firing Modes: Standard, Wide-Beam, Phalanx
Saucer Starboard Phaser G Cannon (Dorsal)
Type: X Pulse/ Phalanx Phaser G
Damage: 250 [25 Power]
Number of Emitters: 200 (up to 7 Shots per Round)
Auto-Phaser Interlock: 3/4/6/9
Range: 10/30,000/100,000/300,000
Location: Starboard Central Dorsal bridge module (Retractable housing)
Firing Arc: 360 degree's
Firing Modes: Standard, Wide-Beam, Phalanx
Saucer Port Phaser G Cannon (Ventral)
Type: X Pulse/ Phalanx Phaser G
Damage: 250 [25 Power]
Number of Emitters: 200 (up to 7 Shots per Round)
Auto-Phaser Interlock: 3/4/6/9
Range: 10/30,000/100,000/300,000
Location: Port Central Ventral bridge module (Retractable housing)
Firing Arc: 360 degree's
Firing Modes: Standard, Wide-Beam, Phalanx
Saucer Starboard Phaser G Cannon (Ventral)
Type: X Pulse/ Phalanx Phaser G
Damage: 250 [25 Power]
Number of Emitters: 200 (up to 7 Shots per Round)
Auto-Phaser Interlock: 3/4/6/9
Range: 10/30,000/100,000/300,000
Location: Starboard Central ventral bridge module (Retractable housing)
Firing Arc: 360 degree's
Firing Modes: Standard, Wide-Beam, Phalanx
Nacelle, Aft Port Phaser G Cannon
Type: X Pulse/ Phalanx Phaser G
Damage: 250 [25 Power]
Number of Emitters: 200 (up to 7 Shots per Round)
Auto-Phaser Interlock: 3/4/6/9
Range: 10/30,000/100,000/300,000
Location: Aft Port Nacelle (Retractable Housing)
Firing Arc: 360 degree's
Firing Modes: Standard, Wide-Beam, Phalanx
Nacelle, Aft Starboard Phaser G Cannon
Type: X Pulse/ Phalanx Phaser G
Damage: 250 [25 Power]
Number of Emitters: 200 (up to 7 Shots per Round)
Auto-Phaser Interlock: 3/4/6/9
Range: 10/30,000/100,000/300,000
Location: Aft Starboard Nacelle (Retractable housing)
Firing Arc: 360 degree's
Firing Modes: Standard, Wide-Beam, Phalanx
Port Forward Torpedo Launcher (High-Yield)
Standard Load: Type II Photon Torpedo (200 Damage), Mark 1 Quantum
Torpedo (400)
Spread: 10
Range: 15/350,000/1,500,000/4,050,000
Targeting System: Accuracy 3/4/6/9
Power: [20 + 5 per torpedo fired]
Location: Engineering forward, port
Firing Arc: Forward, but are self-guided
Starboard Forward Torpedo Launcher (High-Yield)
Standard Load: Type II Photon Torpedo (200 Damage), Mark 1 Quantum
Torpedo (400)
Spread: 10
Range: 15/350,000/1,500,000/4,050,000
Targeting System: Accuracy 3/4/6/9
Power: [20 + 5 per torpedo fired]
Location: Engineering forward, starboard
Firing Arc: Forward, but are self-guided
Port Aft Torpedo Launcher (High-Yield)
Standard Load: Type II Photon Torpedo (200 Damage), Mark 1 Quantum
Torpedo (400)
Spread: 10
Range: 15/350,000/1,500,000/4,050,000
Targeting System: Accuracy 3/4/6/9
Power: [20 + 5 per torpedo fired]
Location: Engineering 'Spine', aft port
Firing Arc: Aft but are self-guided
Starboard Aft Torpedo Launcher (High-Yield)
Standard Load: Type II Photon Torpedo (200 Damage), Mark 1 Quantum
Torpedo (400)
Spread: 10
Range: 15/350,000/1,500,000/4,050,000
Targeting System: Accuracy 3/4/6/9
Power: [20 + 5 per torpedo fired]
Location: Engineering 'Spine', aft starboard
Firing Arc: Aft but are self-guided
Port Ventral Torpedo Launcher, Forward
Standard Load: Type II Photon Torpedo (200 Damage), Mark 1 Quantum
Torpedo (400)
Spread: 6
Range: 15/350,000/1,500,000/4,050,000
Targeting System: Accuracy 3/4/6/9
Power: [20 + 5 per torpedo fired]
Location: Engineering ventral bottom, Forward port
Firing Arc: Forward, but are self-guiding
Starboard Ventral Torpedo Launcher, Forward
Standard Load: Type II Photon Torpedo (200 Damage), Mark 1 Quantum
Torpedo (400)
Spread: 6
Range: 15/350,000/1,500,000/4,050,000
Targeting System: Accuracy 3/4/6/9
Power: [20 + 5 per torpedo fired]
Location: Engineering ventral bottom, Forward starboard
Firing Arc: Forward, but are self-guiding
Port Ventral Torpedo Launcher, Aft
Standard Load: Type II Photon Torpedo (200 Damage), Mark 1 Quantum
Torpedo (400)
Spread: 6
Range: 15/350,000/1,500,000/4,050,000
Targeting System: Accuracy 3/4/6/9
Power: [20 + 5 per torpedo fired]
Location: Engineering Ventral bottom, aft port
Firing Arc: Aft but are self-guided
Starboard Ventral Torpedo Launcher, Aft
Standard Load: Type II Photon Torpedo (200 Damage), Mark 1 Quantum
Torpedo (400)
Spread: 6
Range: 15/350,000/1,500,000/4,050,000
Targeting System: Accuracy 3/4/6/9
Power: [20 + 5 per torpedo fired]
Location: Engineering Ventral bottom, aft starboard
Firing Arc: Aft but are self-guided
*Chain Reaction Pulsar
Standard Load: Reaction Pulsar Device (400 Damage, accumulating
**)
Spread: 1
Range: 15/350,000/1,500,000/4,050,000
Targeting System: Accuracy 3/4/6/9
Power: [50+10 per shot]
Location: Saucer, Retractable expanded module
Firing Arc: Forward or Aft, but is Self-guiding
Port Missile Rack, Dorsal
Standard Load: Type I Anti-Matter Missile (100 Damage), Type IV Ultritium
(600 Damage)
Spread: 20/10/5
Range: 15/350,000/1,500,000/4,050,000
Targeting System: Accuracy 3/4/6/9
Power: Independent Power Source incorporated into the rack
Location: Engineering Dorsal,
Firing Arc: Forward or Aft, but is Self-guiding
Starboard Missile Rack, Dorsal
Standard Load: Type I Anti-Matter Missile (100 Damage), Type IV Ultritium
(600 Damage)
Spread: 20/10/5
Range: 15/350,000/1,500,000/4,050,000
Targeting System: Accuracy 3/4/6/9
Power: Independent Power Source incorporated into the rack
Location: Engineering Dorsal, starboard
Firing Arc: Forward or Aft, but is Self-guiding
Port Missile Rack, Ventral
Standard Load: Type I Anti-Matter Missile (100 Damage), Type IV Ultritium
(600 Damage)
Spread: 20/10/5
Range: 15/350,000/1,500,000/4,050,000
Targeting System: Accuracy 3/4/6/9
Power: Independent Power Source incorporated into the rack
Location: Engineering Ventral, Port
Firing Arc: Forward or Aft, but is Self-guiding
Starboard Missile Rack, Ventral
Standard Load: Type I Anti-Matter Missile (100 Damage), Type IV Ultritium
(600 Damage)
Spread: 20/10/5
Range: 15/350,000/1,500,000/4,050,000
Targeting System: Accuracy 3/4/6/9
Power: Independent Power Source incorporated into the rack
Location: Engineering Ventral, Starboard
Firing Arc: Forward or Aft, but is Self-guiding
Torpedoes Carried: 500 + 50 Tri-Cobalt Torpedoes (750 Damage) 22 Cobalt -Thorium Devices 1250 Damage)
Shields (Forward, Aft, Port, Starboard)
Shield Generator: Class 7 (1300 Protection)
Shield Grid: Type C (50% increase)
Subspace Field Distortion Amplifiers: Class Theta (400 threshold)
Backup Shield Generators: 4 (1 per shield)
Regeneration: Class 4 (regenerates 50 protection per round, shield
recharge time of 20 seconds) [1
power/point regenerated/round]
Auto-Destruct System
Auxiliary Space Craft Systems
Shuttlebay(s): Capacity for 35 size worth of ships
Standard Compliment: 1 Venture class Scout, 12 Shuttles, 1 Advanced
Shuttle, 6 Shuttlepods, 1
Runabout U.S.S. Potomac NCC-72143
Locations: Aft Engineering, Aft Saucer
Captains Yacht: No (Specialized Assualt/Infiltration Vehicle, Rouge
class Gunship U.S.S. Chupacabras)
Description and Notes:
Fleet Data: The Frontier project was developed in the Mid-2360's
as an answer to the growing Romulan threat in the Beta Quadrant theater.
Based off the Freedom Project of the Early 24th Century and the proposed
Nova class of Strike Cruisers, the Frontier class went through several revisions
and prototypes before arriving at the final design destined for the USS
Frontier NX-74356 in 2371.
Soon afterward, the USS Yorktown, NCC-1717-D was constructed as a successor to the Ambassador class Yorktown-C lost in 2371, and was launched on December 15, 2372 from Beta Antares Shipyards. It would be wrong not to mention that many design innovations of the improved Strike Cruiser design were incorporated into the ever tested Prometheus class of vessels. Under command of Starfleet Veteran and former commander of the legendary Yorktown-C, Captain Kyle Roberts was quick to offer insight into the new Frontier project. Consequently he had his own hand in it's development, since his Theoretical Engineer was a integral part of the development of the ship. Specifically the T/Mara warp system covered later in this section.
The Yorktown incorporates a multi-tude of advanced and experimental technologies. Included are regenerative shielding, 'Phalanx' phaser G blisters, para-dynamic holo network emitters, tetryon plasma warp system to name a few. It's covered array of type 11 (XI) emitters which are strategically and ominously placed in multi-redundant 'Uni Directional' phaser system, developed specifically for the Frontier Project. The System incorporates 8 individual class 5 type XI phaser strips on the dorsal saucer, 2 larger class 7 emitters on the ventral Saucer. Each strip is coordinated to provide maximum fire arcs and volleys in a proverbial 'wave' of phaser firepower. While the Emitters are no more powerful then a Sovereign class type 12 (XII) arrays, they can lay a minimal fire arc of at least 5 to 6 Phaser blasts to port, starboard and fore with constant cooling and regenerative capacitors allowed by the advanced TPS power conduits. This is only describing the main saucer phasers, not including the 4 other emitters and the 6 Gattling Phaser Blisters placed in retractable housings.
'Phalanx' phaser G blisters are essentially heavily modified type 10 (X) emitters designed to fire 4 times with a single measurable unit of power. The result is a fast targeting/fireing phaser 1.5 times the power of the Standard Type 10 emitters, nearing the destructive power of Type 13 Starbase emitters. Originally developed by the Hydrans during the Lost colony expansions, this technology found it's way into Starfleets arsenal thanks to the Mirak alliance of the 23rd century and the advent of Pulse Phasers for the Defiant Project. Although functionally and systematically different then Pulse Phaser turrets, Phaser G's are often confused with Pulse Phasers by all but the most naive of officers and cadets. This point defense system is invaluable in missile, fighter and projectile defense.
Projectile equipment on the Frontier class consists of 8 Multi-purpose Torpedo Launchers, 4 Forward located on either side of the main deflector and the ventral engineering hull, the other 4 facing aft along the 'spine' and ventral aft of the engineering hull. 4 of these 8 launchers are high-yield, capable of firing any type of Photon and Quantum Torpedo (along with Specialized ordnance such as Tri-Cobalt Torpedo's and Cobalt Thorium Devices) and also with variable probes and drones. The remaining 4 launchers are the launchers that are essentially the same type as those equipped on the Defiant class of escort and the Akira class heavy cruisers. They are also capable of split fire and nearly any other configurable combat layout needed during combat. In addition to the torpedo launchers the Frontier, like most other Starfleet vessels can mount missile racks to add to it's offensive punch. In the 23rd century, missile types haven't changed in function if not in design. Type 1 Missiles are designed for anti-projectile/fighter usage and are loaded with set packages of anti-matter. Type II are photonic missiles. These types are not usually equipped on any type of Starship, usually reserved for fighters, shuttles and other small craft or escorts. Type IV are heavy ultritium missiles, meant for close in capital ship engagement. Each missile has the explosive yield of about 1.5 of a quantum torpedo and are deadly if caught in a spread.
The aft Saucer is also equipped with an expandable module on a proverbial 'roll bar' that can raise and move into position to serve a variety of functions. Like her Exploratory Cruiser Cousins, the Module can be fitted with the most advanced of Scientific equipment for any number of Missions profiles. During War-time it was specifically designed to equip added Rapid Torpedo launchers, Phasers, and or Missile Racks. Recently the new Chain Reaction Pulsar weapon was fielded and tested by the USS Yorktown against Several Draconan targets, which was subsequently design by the Chief and Theoretical engineers of the Yorktown.**
* Further information about Projectile Ordnance is hearby classified by Starfleet Intelligence, Executive order 4581.2 Sub section 47*.
Defensive systems consist of Multi-Phasic Regenerative shielding, able to regenerate Shield energy dissipation until the said emitter is destroyed or dislodged from it's housing. The Ablative armor of the vessel, like all PDD vessels is Multi-layered. The First 2 Layers are the Outer and inner skin that is systematically grafted the the Duranium/Tritanium meshed hull. The Outer is placed in explosive hull plating which can be ejected (Up to 50% of it) to increase sublight speed efficiency. The Inner grafts are worked into the standard hull to reinforce systems. The Inner most 'shell' layer spans from the Saucer Command house, back to the rear Engineering and Power Transfer conduits, and is welded with 2 Meter thick Ablative shell in the most vital of Area's; Engine core, Power systems, Computer Cores and Bio Neural processors, Sub-bridge and ordnance storage bays. This system allows the inner most vital systems to sustain direct hits even if the surrounding hull has been breached. The Frontier incidentally is the largest of Starfleets vessels to be equipped with Ablative Armor. For Internal Security the Ship is protected by an advanced Holo-graphic projection network and Transporter inhibitors placed strategically throughout the ship in case of Shield Failure.
The Para-dynamic Holo projection net is a revolutionary advance in both Holo-graphic and Sensor Decoy technology. It's primary use is to deflect it's own unique warp Signature up to 200 million KM from it's true location, throwing off pursuing craft. It can also be utilized to portray impressions of 'known' species vessels, such as Romulan, Klingon, Cardassian, Borg for obvious purposes. In close quartered Combat the PDHP net simulates actual Starships in space, portraying fake warp signatures, life signs, power spikes and drops to fool enemy sensors. It also projects sensor data such as impact damage and ship or vehicle destruction to near perfect simulation. Although the most sophisticated Sensor systems and the most experienced of Sensor officers can distinguish inconstancies in the projections, in fast paced fleet engagements a few distracting seconds is all a Skilled Commander needs to take charge of the field. Like the Prometheus class of vessels, the entire ship is equipped with internal holo-emitters on every deck for a variety of reasons. This system also distorts the Warp Signature of the Frontier class of vessel or nearby vessels, making the ship look like a random subspace energy phenomenon to long range sensors.
Another proposed but rejected use for the PDHP was for a 'chameleon' type of Cloak. By narrowing the fields of the Holo projectors the skin of the Vessel can be altered to display fooling marks, or in full power output can project an actually hull of a 'larger' vessels around itself. Coupled with the sensor decoy's and echo displacement such an equipped vessel could disguise itself as an enemy vessel, getting the jump on the opponent or the most sinister of reasons espionage. ASDB, and Federation officials deemed this would Violate the then Treaty of Algeron and quickly informed it's Starfleet commanders of it's limitations. In practice however, the PDHP can be utilized in rather broader matters. With the recent Dominion war, and the fact that Cloaking technology is not what it used to be thanks to the advent of Dominion and War-time allied technologies, the Treaty of Algeron may be even further revised.
The Power systems of the Yorktown can be credited to two inventions, one based on the Brilliant designs of Starfleet Corp. of engineers Commander Ahrix and of one that seemed to have very different roles, the Quantum Torpedo. The T/Mara or Tetryon Plasma Warp system was created based on lost Tymodian technology and SCOE and ASDB design teams. Running on a Specific Mix of Proton/Anti-proton reactions, The Tetyron plasma matrix is fed into the nacelles, generating the warp field. Tetyron plasma radiates at high EM wavelengths, and can produces Sub-space/Gamma ray reaction allowing the ship to further avoid damaging the Spatial Time Continuum and more efficiently distribute power to the ships systems. Instead of Standard Starship EPS conduits, the TPS conduits of the Frontier class are based in ablative sheaths and increase the overall power efficiency of the vessel to that of 135% over that of a Frontier class equipped with a Standard MARA drive. One of two side effects of the system deals with the seamless interaction with the TPS warp distribution systems and the Overall phaser array allows the Ships phasers to fire and recharge their capacitors faster then other equipped ships. This also allows for greater cool down times and less Capacitor burn outs in combat, allowing the Frontier to outgun most space-borne craft when utilized in full Assault mode.
The Second unique aspect of the T/Mara drives is the invention of the Quantum Flux Collimator units (QFC). Essentially enlarged Quantum Torpedo's, these units measure in size of a Venture class Scout, or about 25 meters long. They are simply Generators, collimating the Zero point energy barrier like it's smaller projectile cousins, but for the purpose of Energy reserves and storage. They are designed to run on the High Energy Tetryon Plasma generated by the Frontier class's warp Engines, constantly storing and generating Power on the most minimum of Power to run. During the high paced Engagements or other Phenomenon and missions, Main power or even Auxiliary and Emergency power reserves can be depleted and shut off at the most inconvenient of times. Due to the Unique nature of the Zero point energy conversion rate it can be activated even when other systems have been completely depleted of power. Since they are constantly charging during normal use the Collimators are used to supplement power during Assault Mode to increase long-term combat efficiency, but is used cautiously. Over dumping of the raw energy of both the Collimators and the Standard engine output can theoretically overload even the TPS conduits, causing massive system failures. It's general practice by the Frontier Commanders to utilize the Collimators only when all other power reserves have been exhausted. If need be, the entire ship can run 24 hours at full warp and functional output with the Warp Engines completely shut off. This is handy during War-time deep space tour duties and functional retreating repairs.
Structurally, the Frontier class of Starship is designed to withstand significant amount of punishment both on it's outer hull and inner priority systems with multiple redundant systems and power modules. This is also assisted by the armor sheathed TPS Conduits as well as the transverse Ablative bulkhead system spread throughout the entire ship. The outer 'ring' of the Saucer section is actually a collection of 6 extractable multi-purpose modules and 2 swappable Impulse housings. This swap out system specially designed for the Frontier class allows for greater mission specific, replaced damaged sections, easy access to inner Saucer sections for Computer core and various other system removals. This overall effect gives the Frontier the advantage of layover at a Dry-dock or Starbase 1/3 less then that of the Comparable Exploratory cruisers and Larger Explorers. This system was found to work field miracles during the Dominion conflict, allowing the Frontier Strike cruisers to be repaired and refitted faster then the Dominion forces could generally incapacitate one of them. This also makes the Frontier one of the most resilient and compatible starships in Starfleets arsenal.
The Standard crew compliment is 450-500 Officers and crew and up to 3000 troops during wartime situations.
The Rogue Wing Special Strike force is permanently based aboard the ship,
numbering 124 even in peacetime. They are commanded by Major Noh`vahl`,
a Large Mirak and famed Starfleet Rapid Response teams commander, the Rogue
Marines were formed during the advent of the Dominion war. Consisting of
the Hand picked best of all of Starfleet by Commandant Roberts and Major Nar`,
the 1/3 minority of the group consists of former Mercenaries, criminals and
other elements of the frontier zones of the known
galaxy. Similar to the French Legions and British counterparts of the North
African Campaign in Terra's W.W.II era, Captain Roberts originally conceived
the idea during the initial build up of Dominion forces in the Alpha Quadrant
in late 2373. Under the theory he'd rather have these people doing some good
for other people, instead of their more disreputable life styles, Starfleet
grundingly approved of the project. The Stipulations of service in the Rogue
Wing is Full Federation citizenship and Pardoning for any past crimes. In
essence all sign's get a fresh start required they work for the Federation.
Despite their rather shady backdrop, the Rogue Wing Marines are one of the
most respected, envied and awed of all mobilized units in Starfleet, if
not the entire quadrant. The Subsequent missions they have helped bring
about has changed the face of the Federation, crediting their valor and
commanders alike.
The Strike cruiser profile was conceived on the premises of Combing the Versatility of the Exploratory cruiser, Expanded Command Facilities, and the Sturdiness of the Heaviest Frigate classes. What they got in the end was a high priced and researched cruiser with the firepower of a Dreadnought. It's main drawbacks were it's price and it's lack of 'pick up' at Sublight speeds, having it's dead mass slowed the inertia curve and made the ship drag a few minutes before making it to full impulse power. This was due to it's unit mass and the Heaviness of the Ablative Armor, normally not equipped on large vessels. This was compensating with the improved dual Luminal Impulse drives on the Saucer and the extra 'SLAM' Impulse booster in the aft of the Saucer, Secondary hull housing. It's Construction was the most expensive of any of the cruiser classes, surpassing even a Sovereign class in expense. Only 4 vessels were Originally constructed and tested throughout the decade of the 2370's and none of the vessels were lost as of 2377. This thus far perfect operational record, even through the Dominion and Armada conflicts impressed the highest of Starfleet's brass, considering the construction of several more. This has been pushed back in favor for the Dreadnought/Tactical explorer and Carrier designs, which could perform deeper range missions.
Noteworthy Vessels/Service Records/Encounters: U.S.S. Frontier, NX-74356
(Served in the Draconan operations theater on 2378), U.S.S. Yorktown, NCC-1717-D
(Under command of Commodore Kyle Roberts as of Stardate 559182.00 2378)
U.S.S. Horizon, NCC-74871
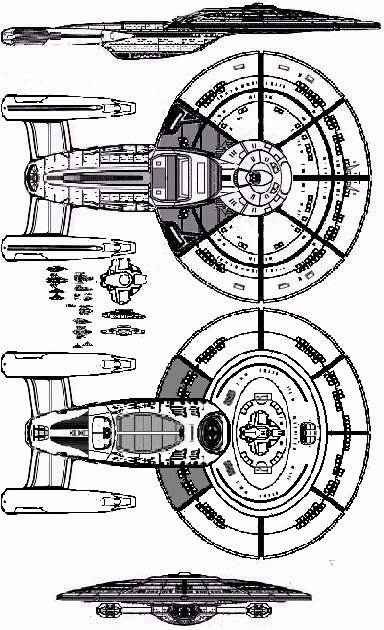
Orthographic Views/ Frontier class: